The couch had been sitting in front of the window without any blinds which caused the material to breakdown and fall apart. I did not want to simply cover the couch because I thought the dust and particles would just come straight through the new material eventually. I am not an expert on sewing, I know how to sew, but consider my self a novice with sewing.
The couch looked like it was separate pieces of foam, but after taking them apart I realized there was actually 4 pieces of foam (2 long pieces of foam for top and 2 for bottom). I wanted to try to save the foam and wash it like I did with the dinette seats but when I was taking them apart they started falling apart so I had to order some from . I also ordered some dust cover upholstery fabric on amazon to match my new material. I kept the wires that helped attach the foam to the frame.
First step: TAKE LOTS OF PICTURES while taking apart of every angle and seam. There were times when I was putting it back together wishing I had got a better picture of a certain seam. Also if you can mark on the old material numbers before taking apart it may help you (I did not do this but it was my after thought wishing I had done that).
I didn't take a picture of the couch on the jack knife frame, but after we took them off the main frame I started pictures. This is the back rest and seat (the back rest is upside down, you can see the material in the center falling apart.
This is the other pictures showing the back, and how the foam was...
Laid the material out to be cut...
Make sure you pay attention to direction of pattern on the new material because you want it to be as straight as possible and match the direction of the rest of the cushions made. Follow the pattern from the old material and the pictures you took. Any thing that can be sewn before attaching to the main material should be sewn now, make sure you change tension on sewing machine for upholstery material to withstand (I didn't know I had to do this until looking up how to sew a couch. I changed it to my highest setting allowed on my machine). Also there are some holes in the material to allow the metal screws to attach to the frame, but my material frayed easy so I made button holes to reinforce the material.
The top soft foam was actually one large foam that had been cut to make grooves (I posted a picture showing this above). So I cut my foam the same way (I used a cheese knife lol).
I attached the foam to the dust cover I cut using spray adhesive.
Then I laid the material on the foam and tucked the material into the grooves to pin the sides on. If you sew just the material together first before attaching the cushion bottom it helps make things easier in the end. Then put the cushion with the dust cover on by pinning and then sew that together (it makes a sandwich basically - top material, cushion, then dust cover).
I found out if you pin all the straight parts together and have someone help you hold the cushion you can sew it in the machine and then hand sew the parts that curve around. My machine did not do well with the curved parts (from the cushion pulling the material from the foot).
After the top part of the cushion is done, you put the more dense foam in, add a little fiberfill where the curved part of the top foam curves around bottom (to keep looking full over time) then start attaching to the frame using hog rings and a pliers.
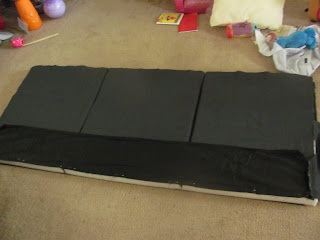
And viola you have the making of a jack knife couch. (I don't have it on the main frame yet but you can see what it will look like together). I will post a picture once it's installed in the camper.


No comments:
Post a Comment